

While evaluating a scan, it is possible to exclude known false positives or pages with unresolved issues following the procedure below.
Identifying pages to exclude from scan results
The first step in deliberation is to consider whether or not these pages should be excluded from your scan results. Here are three common use cases for excluding pages from your scan.
- The crawler has found internal URLs to other subsites which use the same baseline URL.
- The crawler has found subfolders which are used for separate projects and not part of the main site.
- The crawler has identified intranet pages which should otherwise be considered private.
If any of these issues apply to you, please send an email to the site administrators bjd18 at psu.edu or mlb354 at psu.edu and we can exclude these pages from your results.
Identifying false positives
Compliance Sheriff is a pretty handy service, but automated tools have their limits. You may notice errors which clearly make no sense. Let’s take a look at an example.
Page contains substantial text but does not contain headings
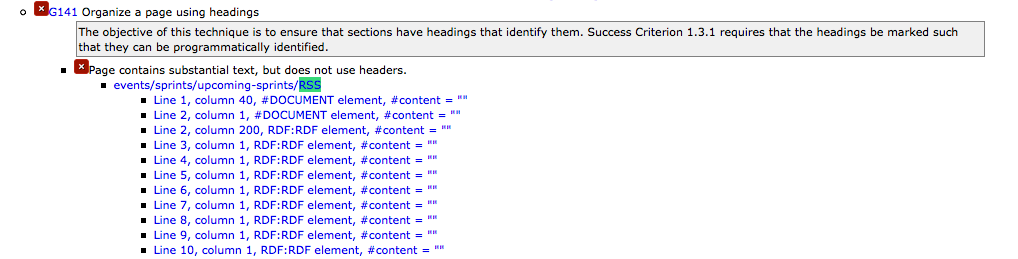
Compliance sheriff has flagged this RSS page for not using headings. However RSS templates do not use headings.
Submitting these findings to the site administrators is quite helpful as false positives can often be affecting more than one unit. With helpful feedback on these issues, the administrators may have a chance to remedy the situation by adjusting Checkpoint rules.
Revising scan results
There may be occurrences in which results will show up in your scans which you may interpret differently than Compliance Sheriff. While in many circumstances, the easiest solution may be to simply fix the errors, there is a path to contest those results.
If you click on the health percentage score to look at your report, you will notice three buttons at the top of the page. Click on Revise results.

This will take you to the default page of the Results Revision Wizard.
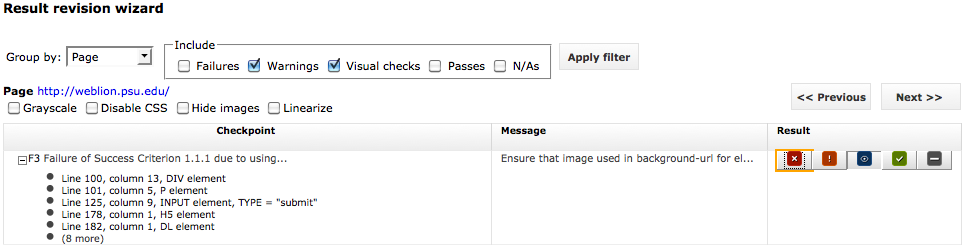
From here, you can group your errors in one of two ways: By page or By Checkpoint.

You can also change what results show up in the revision wizard by selecting which criteria to include.

Once you’ve narrowed down the results, you can click “Next” and “Previous” to navigate to the error you wish to revise.

Once you locate the error, you can then change its Error Type by clicking on the colored icons. This will allow you to move errors into other categories like failures, warnings, visual checks, passes. This will also allow you to flag false positives as as N/A or “not applicable”.

Finally, clicking “Close”, “Next”, or “Previous” will commit your change to the database.