

Page Content
This page is part of a quick InDesign Accessibility Mini Tutorial
Summary of InDesign Accessibility Checks
Below are the steps needed to ensure that an InDesign file will be exported with most of the features needed to generate an accessible PDF. Click the links below for additional information.
A. Contrast and Typography
Take note of accessibility factors for font selections and the use of color contrast and color deficient issues when designing the document.
Note: Color and font choices can be difficult to repair in an exported PDF. These choices can "break" a PDF file in terms of accessibility.
B. Add Heading Tags and Bookmarks
Different Paragraph Styles can be set to export as PDF tags. See the InDesign Styles to Tags page for more information.
- Paragraph Styles for headings and subheadings should be set to export as H1-H6.
- Other paragraph styles should be set to exoprt as a P tag.
- List paragraphs should be set to export as a LI tag inside a list tag.
- Use the Bookmark tools to add additional navigational landmarks.
C. Image ALT Text
Content images need appropriate ALT text, and decorative elements need to be tagged as an artifact. To add ALT text within InDesign:
- Use the Object Tool : Object Export Options window to add image ALT Tags and Anchor Images to the Content for reading order.
- For decorative elements, set the tag to Artifact.
Note: This can be automated within Object Styles for repeated elements such as textboxes or tool lines.
D. Set Reading Order
Use the InDesign reading order tools to verify and establish reading order within InDesign. This ensures that a screen reader is reading the content in sequence.
- Threading text in text boxes as continuous flow helps maintain correct reading order.
- Use the Anchor tool with images and text frames outside the main thread to ensure that they are placed within a logical place in the content reading orders.
E. Table Accessibility
If your InDesign document includes data tables, then ensure that the following table guidelines are met.
- Avoid merging cells. It is better to use paragraph or cell border styles to mimic the appearance of single cells.
- If tables have a label, then make sure that the label is in a Paragraph Style which is exported as a low level heading.
Note: The H tag can be converted to a CAPTION tag within Adobe Acrobat. - Convert the first row of a table to a header. To do this.
- Highlight the first table row.
- Right click and select the option Convert to Header Rows.
Note: If you see the option Convert to Body Rows, that means the current row is a header.
- Avoid using tables for layout purposes. Consider using colored text frames, borders and shading on paragraphs or columns to achieve the same visual effects.
- Table Styles can be used to streamline formatting.
Changes in Acrobat
Some guidelines needed for an accessible table can only be completed within Adobe Acrobat.
- Add a (or change an existing tag to a) CAPTION tag
- Change row header cells from TD to TH
- Add SCOPE attributes for COL or ROW
The University of Oregon PDF Tutorial gives instructions on how to use the Adobe Acrobat Table Editor tool.
F. Language Tags
The term "Language Tag" refers to metadata indicating the language of the text. Specifying the language is important for screen reader pronunciation accuracy and for ensuring accurate spelling and grammar checks.
In the most recent versions of Adobe Acrobat, the document language is automatically set to that of the user interface – most likely U.S. English.
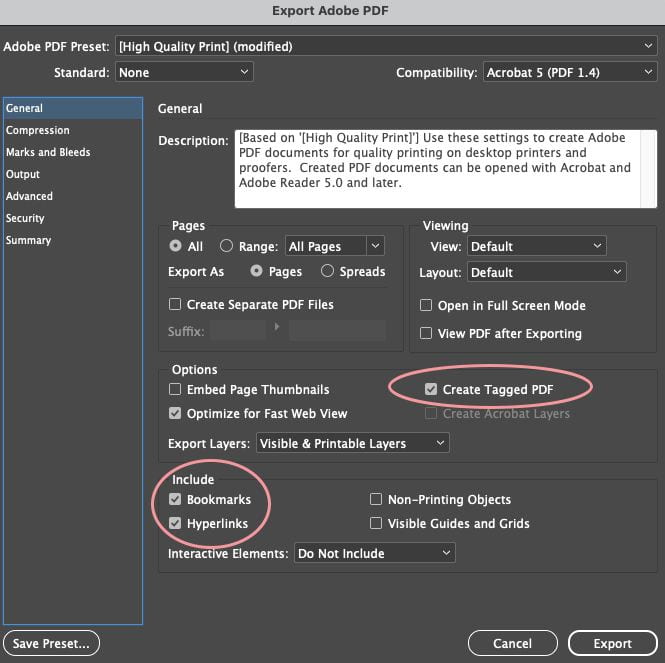
Export Tagged PDF
When exporting a PDF from InDesign to PDF, make sure that all options for tagging and bookmarks are set.
Export How To
To export your InDesign document to a tagged PDF:
- In the File menu, select Export (Control+E (Win) or Command+E (Mac)). A Save/Export file window opens.
- In the Format drop down menu, select the Adobe PDF (Print) format. An export dialogue opens.
- Ensure that the following options are checked.
- Create Tagged PDF
- Include: Bookmarks
- Include: Hyperlinks
- Review and change other export options, then click Export to complete the process.
- Verify and complete additional accessibility options in Adobe Acrobat.
Final Check in Adobe Acrobat
Once you have exported your PDF, you should open it up in Adobe Acrobat and verify that the PDF tagging and reading order is what you expected.
Some changes that can only be done in Adobe Acrobat include
- Finalizing table accessibility
- Adding non-English language tags
Last Update: September 1, 2023