Page Content
Adobe Dreamweaver comes with a variety of tools and reporting functions to help create sites that are accessible from the start.
Activate Accessibility Options
To (re)activate Dreamweaver’s accessibility functions, do the following:
- Open Dreamweaver and go to File then Preferences (Windows), or go to the Dreamweaver menu, then Preferences (Mac).
- Click on Accessibility on the left side of the panel.
- Make sure the options for Show Attributes when Inserting are checked for each type of HTML object.
- Click OK to close the window.
The next time you insert a table, graphic, form or other media, a pop-up window will appear to prompt you to enter the appropriate accessibility tags for each item.
Properties Panel
The Dreamweaver Properties panel includes options for inserting accessibility tags depending on the item being edited.
For example, when an image is highlighted, the ALT tag can be edited in the Properties panel.
Word Header Styles
In Dreamweaver, when text is pasted from Microsoft Word, the Header 1, Header 2, and Header 3 styles are converted to H1, H2, and H3 tags. These styles are available in Word’s Style menu.
Word users can use the Format » Styles options to modify the appearance of these styles in a Word document.
Create Accessible Data Table in Dreamweaver
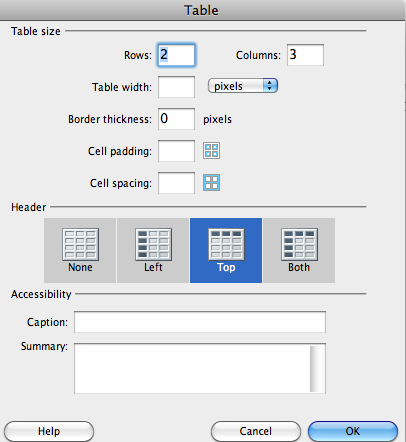
- In Dreamweaver, go to the Insert menu then Table. A pop-up window opens.
- Fill in desired settings for rows, columns, width, border thickness, cell padding and cell spacing.
- For the Header options, select from Left, Top, Both
Note: Top or Both is the most widely supported in screenreaders. - Enter in text for Caption and Summary as needed.
Note: Caption is visible by default to all users, while Summary is used to provide extra information for those on screenreaders. - Click OK to create the table


