

Page Content
One of the most important issues for screen reader accessibility is to ensure that the multiple boxes in a PowerPoint Slide are read in the correct order. Unfortunately, it is one of the most confusing things to check for PowerPoint editors.
This blog entry will show some of the available tools and explain their pros and cons. Is there are perfect tool? Judge for yourself.
Importance of Reading Order
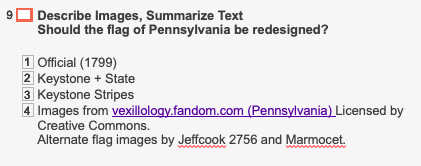
When creating a slide with a complex layout, it is important to ensure that the objects (textboxes, image Alt text and table text) are read in a coherent order in a screen reader. Consider the slide below showing three alternate designs for the Pennsylvania state flag
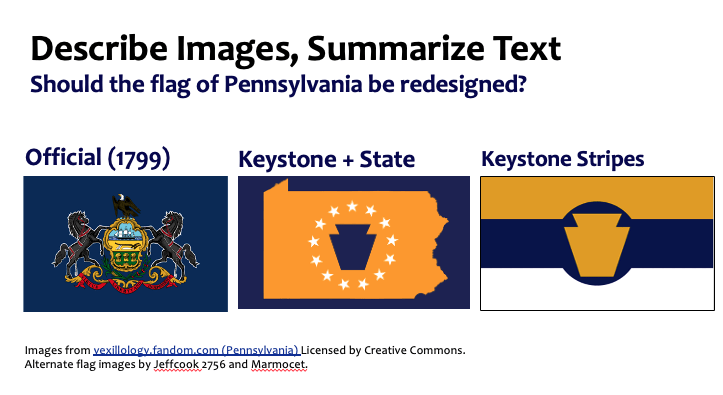
The designs are laid out horizontally with a label above each image. If a typical left to right top to bottom reading order were assumed, the reading order would be incorrect. Instead, the order must be top to bottom, left to right. See examples below:
Reading Order Alternates
Inaccessible Left to Right, Top to Bottom
- Official (1799)
- Keystone + State
- Keystone Stripes
- ALT=Current Pennsylvania flag showing two black horses propping up a shield with a tall ship on top and a field at the bottom. An eagle is sitting on top.
- ALT=Alternate design with yellow state shape on a dark navy background and a dark blue keystone shape surrounded by white stars.
- ALT=A flag with a yellow keystone shape in dark blue circle. The flag is split into three horizontal stripes – yellow, dark blue and white.
Correct Top to Bottom, Left to Right,
- Official (1799)
- ALT=Current Pennsylvania flag showing two black horses propping up a shield with a tall ship on top and a field at the bottom. An eagle is sitting on top.
- Keystone + State
- ALT=Alternate design with yellow state shape on a dark navy background and a dark blue keystone shape surrounded by white stars.
- Keystone Stripes
- ALT=A flag with a yellow keystone shape in dark blue circle. The flag is split into three horizontal stripes – yellow, dark blue and white.
Orientation Based on Title
Whichever tool you’re using, it is important to orient yourself based on the location of the title in the list of objects. This determines whether the list is read bottom to top or top to bottom.
- When the title is on the bottom (most tools), the list is read bottom to top.
- When the title is on the top, the list is read top to bottom.
The bottom to top reading is based on the origin of the ordering tool as a method of arranging layers of objects. Normally the title, which is read first, is placed in the bottom layer.
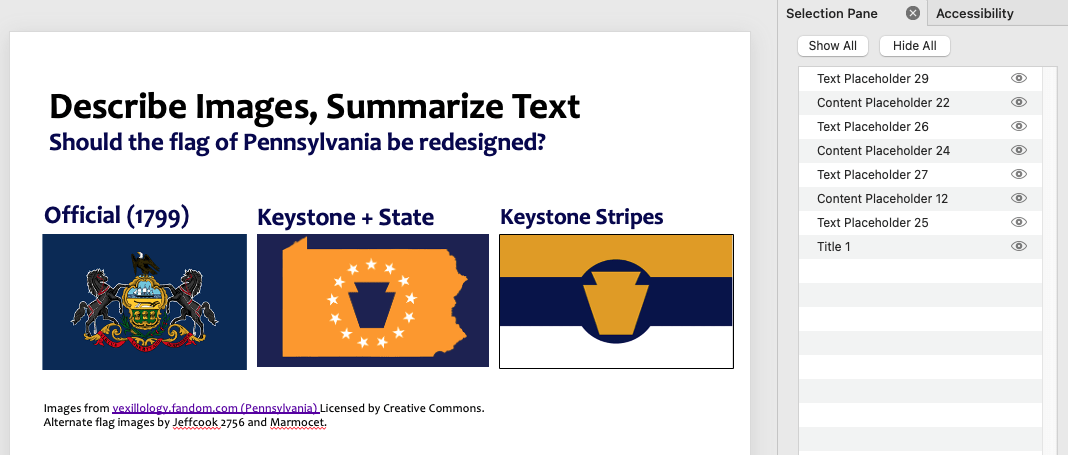
Selection Pane (Accessibility Tab)
The first tool we’re reviewing is the Selection Pane. It has the advantage of being available in every recent version of PowerPoint – both online and the desktop. It also has the same interface in all platforms, but it is a bottom-to-top tool.
How it Works
The tool is housed within the Accessibility Tab (which is only visble after the Check Accessibility report is run). Once selected, the tool opens the pane on the right slide of a slide and shows all the objects within a slide with the Title 1 object at the bottom.
Other items typically include Content Placeholders and various shapes. Note that items not in a Content Placeholder may be skipped over in some screen readers. That’s not an issue if they are decorative, but problematic if they contain critical content.
Activate Selection Pane
- Open a new or existing PowerPoint file.
- Select the Review tab.
- Select the Check Accessibility icon. A report opens in the right, and the Accessibility tab appears.


The Check Accessibility tool in the Review tab activates the Accessibility tab. - Select the Accessibility tab to use the tools, then Selection Pane. The list of objects opens on the right.
- Click each object in the list in the right to see which object is highlighted in the slide body.
OR
- In the Home tab, select Arrange then Selection Pane. The list of objects opens on the right.
- Click each object in the list in the right to see which object is highlighted in the slide body.
Advantages and Disadvantages
Advantages
- Available on all platforms
- Same interface
- All objects listed
Disadvantages
- Bottom to Top order
- Lists items by object type and number
- Must activate Accessibility Tab
Outline Order
The Outline Order tool generates an ordered list of objects based on the order of content placeholders within a particular Layout.
How it Works
The Outline View shows the title and any text within a Placeholder within a slide – as a bonusany text can also be edited within the Outline View. More importantly, only text inserted within a Placeholder from a Master Slide Layout is shown – If text was placed within an inserted textbox, it will not appear in the Outline .
Activate Outline View
- Open a new or existing PowerPoint file.
- Select the View tab, then select Outline. The Outline view opens on the left.
- To return to the typical editing view, open the View tab and select Normal.
Advantages and Disadvantages
Advantages
- Top to bottom order
- Text is visible in Outline View and can be edited
- Same interface on Mac and Windows
- Text in Outline View guaranteed to be read out in screen reader.
- This view distinguishes text boxes from a layout from other types of text.
- Easy to copy and paste content from PowerPoint to Word.
Disadvantages
- Only text objects are shown
- Not in the online version of PowerPoint
- Order cannot be changed here – only verified
- Does not reflect ordering adjustments made in Selection Pane.
Windows Arrange/Reading Order Tool
In addition to the Selection Pane, some versions of Word for Windows include a separate Arrange/Reading Order tool. Below are two links documenting this tool.
- University of Arkansas (top to bottom)
- Microsoft (bottom to top?)
Note that the University of Arkansas screen capture shows a top to bottom order, but the Microsoft documentation was showing bottom to top.
Which order is correct – check the location of the Title to be sure.
Mac Arrange Tool
How it Works
The Mac version of the Arrange tool displays the objects as a set of transparent layers. This is a bottom to top view meaning that items on the left/bottom are read first.
Activate Mac Arrange Tool
- On the Home tab, select the icon for Arrange : Reorder Objects. The graphical display takes over the screen.
- Use the mouse to move layers to the desired order, then click OK to exit the tool.
Advantages and Disadvantages
Advantages
- All objects are shown.
Disadvantages
- Bottom to top order. Object #1 is to the right in the "top" layer, but read last.
- The visual is complex and may not have good contrast.
Last Update: April 3, 2024