

Page Content
About Slide Masters?
A Slide Master stores information about the default layout of slides within your presentation. The Slide Master determines the default fonts, colors, bullet formats and number of content placeholders for new slides using that layout.
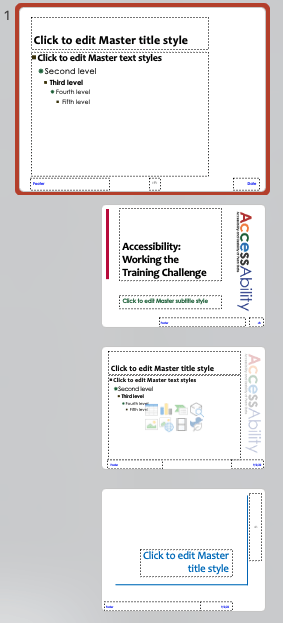
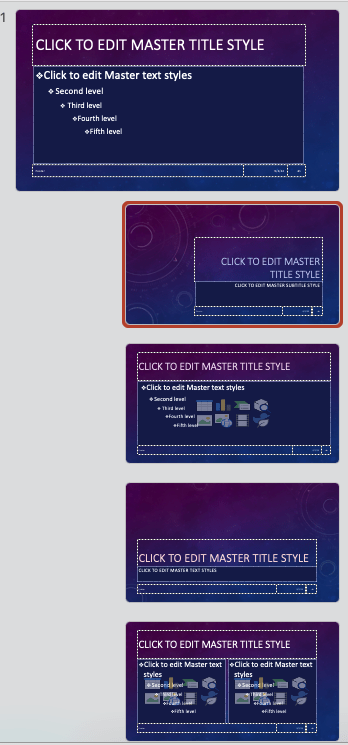
Below are example slide masters and layouts in a presentation.
Two Slide Masters used in a PowerPoint presentation. The first is for section/topic title slides, and the second allows editors to create slides with two, side-by-side comparison boxes.
Viewing Master Slides
All PowerPoint files have slide master templates. To see which one your file has:
- Open any PowerPoint file.
- Navigate to the View tab on top of the document.
- Select the icon for Slide Master. The view changes to show a series of nested slides on the left and the slide master template being used on the current slide. The templates with place holders will include instructions “Click to edit Master …” inside those placeholder. See examples bellow.
- To exit the Slide Master screen, click the close master button on the right.
Note: This button is labeled Close Master View on Windows and Close Master on the Mac.
Example Slide Masters with Layouts
Below are examples of slide masters – the one on the left is from a professional presentation on accessibility and the one on the right is from a presentation about embroidery.
Definitions
- Slide Master – the largest top-most item. Changes made in this master propogate to the lower layouts. Some presentations may contain multiple slide masters.
- Layout – the smaller custom layouts. You can add custom layouts as needed. This is useful if you repeat a type of slide (e.g. an org chart) multiple times.
- Placeholder – the empty boxes within a layout. A Content Placeholder can contain any object. In the presentation, the placeholder can be resized as needed.
Change Default Fonts and Background Colors
- Within the Slide Master tab, select the top-most Slide Master,
- To change default text appearance, select a placeholder, then click the Home tab to access the text formatting tools,
- To change the slide background, right click on the slide background and select Format Background to open a formatting window on the right.
- Change the colors, gradients or background image as desired.
Note: Additional changes can be made to specific layouts needed.
New Layout and Placehoders
- In the Slide Master tab, select the Insert Layout button. A blank layout is inserted.
- Click the Rename button to add an appropriate title.
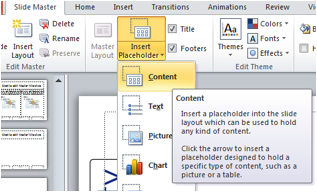
- To add a placeholder, select the button for Insert Placeholderthen the option for Content.
Note: Only items in Content Placeholders are added to the Outline View.
- To add additional placeholders, copy the first placeholder click Insert Placeholder as needed.
Note: The order with which you Content Placeholders, is the order with which the content will be read. Use the Arrange Tool to reorder elements to check and correct the reading order. - When done, select the Close Master View button on the Slide Master tab.

Background Images and Shapes
Background images and shapes can be added to different slide layouts. It is important that the ALT text for all items be set to Decorative.
- To Insert a picture or logo that repeats on every slide, go to the Insert tab and select Picture or Shape, then insert the item.
- Set the Image Alt text to Decorative so it will be skipped by a screen reader.
Note: You can
also set the ALT text to something else if the image is truly content.
Testing Revised Layouts
- In the View tab, select the Normal option. This returns you to the typical editing view. The new font options should be in place.
- In the Home tab, select New Slide to insert a blank slide and confirm that the new font options are in place.
- To select a different layout, select an option from the Layout menu. The number and configuration of the content placeholders will change to match the layout.
If you don’t like the changes, you can return to the Master Slide view and repeat the steps above to edit the fonts.
Tutorial Links
The following sources contain detailed how-to instructions for using Master Slides.
- Accessibility Learning Path: PowerPoint
- LinkedIn Learning – PowerPoint Essential Training
- Microsoft Support
Last Update: September 22, 2023