Word Accessibility Tips
Some document types need to be created over and over. Once you have developed a version with useful styles, you will want to find a way to create new documents with the same styles. Here are some ways you can do that.
Contents
A. Save As…<A New Word File>
The easiest method to transfer styles is to open an existing file with appropriate styles, then use the Save as… command to create a new Word file. This is the least technical method so could be useful if you are sharing a file with someone just wanting a quick solution.
Note: An example of when to use this technique could be to create a new version of a syllabus or an updated document.
How to
- Open a Word file using appropriate styles.
- In the File menu, choose Save As.
- Rename the new file.
- Open the new file and remove or change content as needed.
B. Save As…<.dotx Word Template File>
One option in the Save as… menu is the option for Word Template (.dotx). This saves a Word template file. It opens like any other Word file, but the new file needs to be saved with a new title as if it were a blank file.
Save as .dotx
- Open a Word file using appropriate styles.
- In the File menu, choose Save As.
- In the format menu, select the Word Template .dotx option.
- Add and appropriate name, then click OK to save the file.
Some benefits of .dotx files are:
- The content of template won’t be overridden, but it can be changed in a new blank file.
- You can share the .dotx file with other users.
- Instructions can be embedded.
Disadvantage:
- It’s tricky to update a .dotx file. See the Organizer for some information on updating .dotx files.
Note: This is not the same option as Save As Template – this option creates a .dotx file but places it in your Personal Templates library. This is discussed in the next section.
C. Save as Template <for your template library>
The Save as Template command puts a .dotx file into your Personal Template library. When you create a new file you can open the set of available templates and choose the one needed for your next project. The main benefit to this method is that your template files are stored in one location and can be quickly opened.
Save as Template
- Open a Word file using appropriate styles.
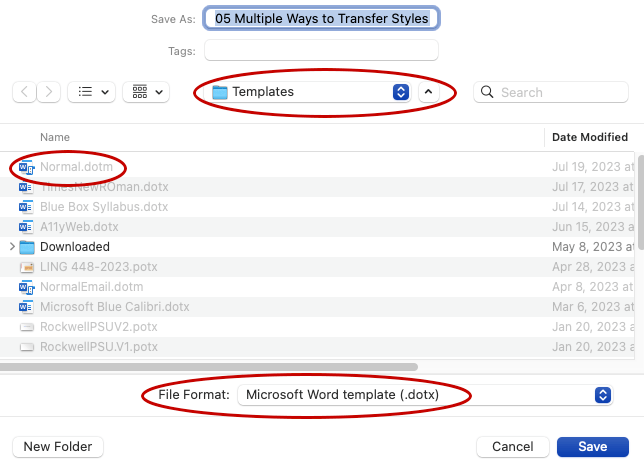
- In the File menu, choose Save As Template. A dialogue window showing the content of your Templates folder is shown. Your file can be saved as a .dotx file within the Templates folder within your Microsoft Office profile.
Note: If you see an option to select a file format such as .docx, you have probably opened the Save As… window.
Open Template from Library
- Open Microsoft Word.
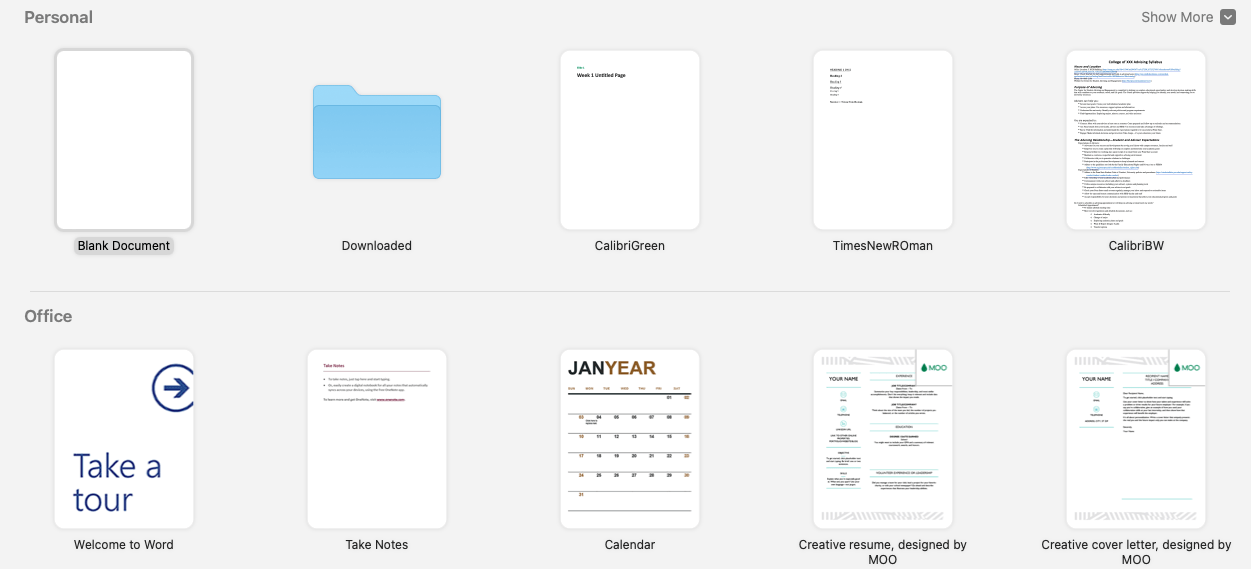
- In the File menu, choose New from Template. A start window will open showing available templates.
- Select the Personal options to see your templates.
Note: If you do not see your Personal category, click on More Templates.
Export the Template
- Open a document using the New from Template command. An untitled document with the styles and any default content opens
- Now go to the File : Save As… command.
- Choose .docx (Word document) or .dotx (Word Template) and save the file. This file can be shared with another person.
D. The Organizer
The Organizer is a tool which allows editors to transfer one or more styles between documents. This tool can help add or update specific styles in a document, update default styles or repair some defective templates.
The Normal.dotm Template
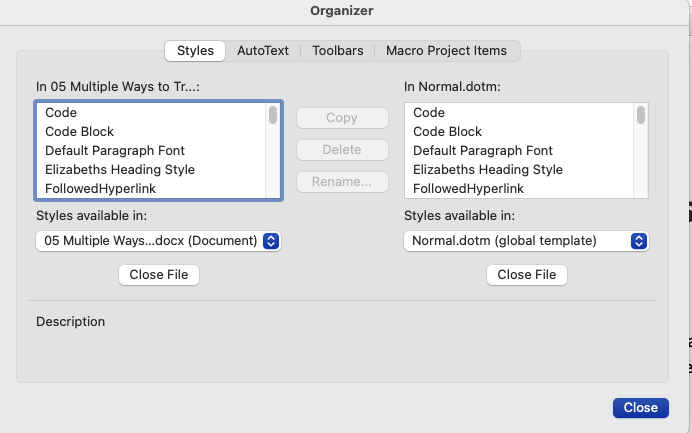
Before discussing the Organizer, it’s important to mention the one template every Word user has – the Normal.dotm file used to create a default "Blank Document." The Normal.dotm file is used to create a generic blank document, and by default it is usually set to the Calibri font with blue Heading 1-6 styles.
For security reasons, it is difficult to directly access and edit this file, but the styles can be updated via the Organizer. Once you settle on preferred default styles, they can be imported into your Normal.dotm file with the Organizer.
Access the Organizer
The method to access the Organizer varies between Windows and Mac. Once opened though, the function is almost identical in both platforms.
Windows
- Open a Word file.
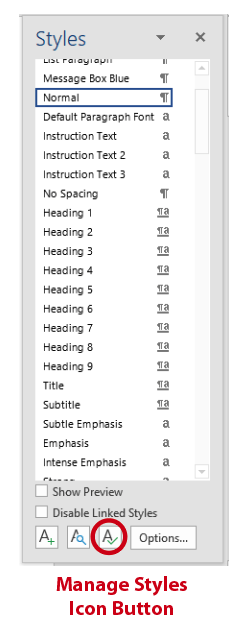
- In the Ribbon (Home tab), click the arrow icon in the lower right section of the Styles. The vertical Styles Pane window opens.
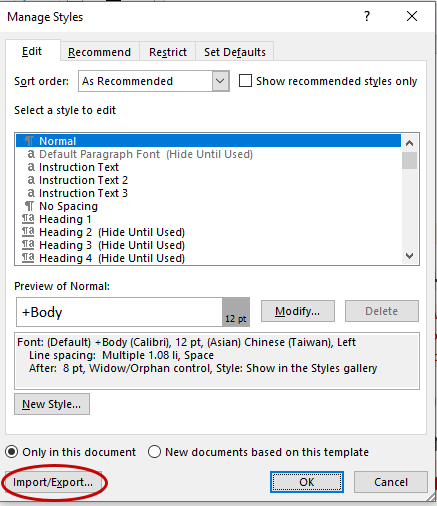
- Click the Manage Styles icon next to the Options button. The Manage Styles window opens.
- Click the Import/Export button located in the lower left to open the Organizer. See additional details below.
Mac
- Open a Word file.
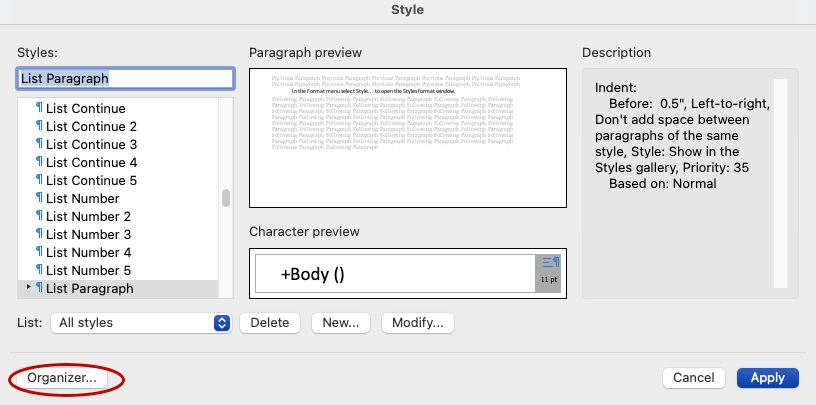
- In the Format menu, choose Style….The Style window opens.
- Click the Organizer button located in the lower left to open the Organizer. See additional details below.
Use the Organizer
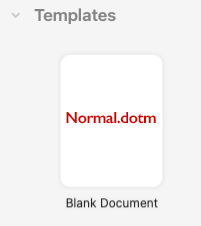
In both Windows and Mac, when the Organizer opens, it shows the styles from the current document on the left and the default Normal.dotm file on the right. To work with the Organizer.
- If you want to transfer files between the current document and another file besides Normal.dotm:
- Click the Close File button below the list of styles for that document. The button label changes to Open File…
- Click Open File button below the blank list and browse for the appropriate file.
- Once the correct documents are open:
- Select one or more styles from either the left or right side.
- Use arrow buttons to transfer styles between documents in either direction.
Note: If you transfer one or more styles with the same name in both files a pop up message will ask if you want to override the style format. - Use the Delete and Rename buttons as needed.
Adjust Default Styles
To update the default styles in your Normal.dotm template.
- Open the Organizer and ensure and the file with the new styles is open on one side and Normal.dotm on the other side.
- Move styles from the second document into Normal.dotm. Override existing styles as needed.
Note: You can also add custom styles from another document.
Restore Default Styles
If you accidentally override styles in Normal.dotm or other file, you can restore all or some of them as follows.
- Open an older document with the correct styles.
- Use the Organizer to transfer styles from the older document into your Normal.dotm (or other file).


