

Page Content
There are several methods by which you can add captions to QuickTime videos, each with its own set of advantages and disadvantages. This page gives step-by-step instructions for implementing each method, as well as discussion of their appropriate use(s).
Recommended Software
Captioning QuickTime videos may require some specific applications, depending on the exact method of captioning you choose to use. Possible required programs, both of which are available on all CLC Macs on Penn State campuses, are:
- For embedding a text track into a QuickTime video, QuickTime Pro.
- For significantly expedited captioning, MovieCaptioner.
Note: Other methods to generate time codes for QuickTime are available.
Creating a Separate Caption File
Creating a SMIL Caption File
One method of captioning a QuickTime video involves creating a completely separate SMIL (Synchronized Multimedia Integration Language) caption file, which can then be added as an additional "track" within the video. This allows typos or other errors to be corrected without editing and re-exporting the video.
You can create a SMIL file manually, but you can also use a program like MovieCaptioner to ease the process significantly.
Note: The W3C Synchronized Multimedia Home Page has an extensive list of alternate SMIL tutorials and other resources.
To create a SMIL caption file in MovieCaptioner:
- Add your captions by following the directions on the page MovieCaptioner: Adding Captions to Videos.
- Under the Export menu, select QuickTime SMIL.
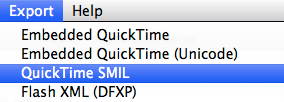
- QuickTime will launch automatically. View the video to ensure that the captions were added correctly.
MovieCaptioner will create two new files: a .txt file, which contains the captions, and a file with the extension .qt.smi. The .qt.smi file combines the video and the captions, and is therefore what you should open when you want to view the captioned video. Likewise, if you’re embedding the video in a Web page, all of your links should be to the .qt.smi file, although all three files (the .txt file, the .qt.smi file, and the original video) will need to be on your Web server.
Note: Mac OS X may attempt to treat .qt.smi files as though they were disk images. This is because the file extension .SMI is also used by an outdated type of disk image file, the "self-mounting image." If OS X attempts to mount the .qt.smi file like a disk image, right click on the file and select Open With » QuickTime 7.
Creating an SCC Caption File
If you want your captions to be suitable for broadcast, or for playing on an iPod or iPhone, you’ll need to create captions in .scc format. See the page Podcasts in iTunes for information on creating .scc caption files.
Embedding a Text Track
One way to add captions to a QuickTime video is to give it a new “track” that will contain the captions’ text. Using this method allows your captioned video to be completely contained in one file, which is simpler to distribute and maintain, but will make changing the captions difficult in the future.
About the Text Track
A text track is added to a QuickTime video by creating a .txt file containing the captions and some simple code, and then adding the .txt file to the video. The code tells QuickTime how to interpret the caption file, as well as when to display each individual caption. A QuickTime caption file will have the following format:
Sample SMIL Code
{QTtext}{font: Arial}{justify: center}{size: 12}{backcolor:0, 0, 0} {timescale: 30}{width: 320}{height: 60}
[00:00:00.00] Caption 1
[00:00:05.15] Caption 2
[00:00:09.08] Caption 3
The file is structured as follows:
- The first two lines contain formatting information for the captions such as font, alignment, size, and background color (in RGB format), as well as the width and height of the their background area.
- Underneath these display specifications are the actual captions, each one preceded by a timecode in square brackets. The timecode specifies the hour, minute, second, and division of a second at which that individual caption should display.
- Divisions of a second are represented by the number following the decimal point in the timecode, but you can adjust the exact size of these divisions by changing the timescale value at the beginning of the caption file. A
timescalevalue of 30 means that each decimal unit in the timecode (i.e..01) is equal to 1/30th of a second. A decimal value of.15is therefore equal to half of a second.
For a full description of the QuickTime text track code, see the WebAIM tutorial “Captioning for QuickTime.”
Creating and Adding the Text Track
To create a text track with MovieCaptioner:
- Add your captions by following the directions on the page "MovieCaptioner: Adding Captions to Videos."
- Under the Export menu, select Embedded QuickTime.

- QuickTime will launch automatically. View the video (a .mov file) to ensure that the captions were added correctly.
- Save the .mov file on your hard drive or server space. This file is your video with the captions added.
"Burning In" the Text Track
In some cases, you may need to “burn” the text track of your video into the video track. This is usually necessary when you’re uploading the video to a service that doesn’t support QuickTime text tracks, such as Penn State’s ITS Streaming server.
Note: The term “burning in” refers to the fact that caption text is incorporated directly into the video image.
See ITS Streaming: Uploading Captioned Videos for instructions on how to "burn" captions into a QuickTime video.
General Notes
Potential Issues
When adding captioning, it’s possible that the additional content will alter the size of the video, adding a large amount of blank space. If this occurs, you will need to adjust the size of the caption track. To do so:
- In QuickTime, click on Window and select Show Movie Properties.
- Find the caption track in the list at the top of the Properties menu. Depending on the type of captions you added, the caption track may be listed as a Closed Caption Track, a Text Track, or a Video Track.
- Click on Visual Settings.
- Uncheck Preserve Aspect Ratio.
- Adjust the size of the caption track to match the size of the video, or so that any additional spacing is eliminated.
More Information
For more information on using QuickTime 7, see Apple’s Self-help resources for QuickTime 7 and QuickTime 7 Pro.
For more information on using MovieCaptioner, see the Tutorial Videos found in MovieCaptioner’s Help menu. Also see the Accessibility and Usability Guide’s page "MovieCaptioner: Adding Captions to Videos."