

Page Content
Sites at Penn State allow students, faculty and staff to design personal websites and blogs sites through a WordPress platform. Accessible design is achievable with simple considerations. These instructions will cover the Top Blockers and give you some of the best practices in regards to accessibility in regards to Sites at Penn State.
Selecting Themes
These instructions assume that you have selected the 2012 theme. Other themes are available, but because functionality can be different, options described below may or may not available in any particular theme.
Page Document Titles
Think about the title and take special consideration when making a new page. This title will appear as H1 in association to the primary content for a Screen Reader to read. This page title describes the topic of the page.
Headings & Subheadings
Organizing your documents content is important. Information about organizing accessible content can be found at Accessibility and Usability at Penn State for Headings and Subheadings.
Several choices for Sites at Penn State: If writing the content formatted or from unformatted content follow these steps:
Add Headings to Blog Entry or Page
- For content that you create on the page, you will need to go to the main menu of the Visual content tab, select the Show/Hide the kitchen sink icon. This will reveal more options in the content manager menu.
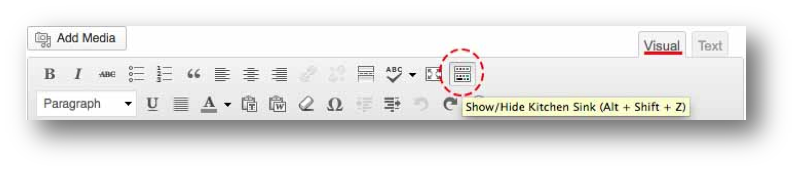
- Highlight the content/heading/subheading you wish to format, while or after you have typed up your content.
- Select the appropriate tag from the Format drop down menu.
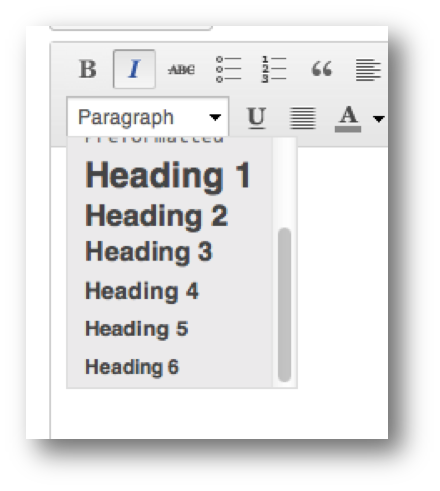
Note: Things to remember about placing content in the content manager; the headings in the main content should begin with H2 like the rest of the site and descend with the other subheadings. When you created the page, the page title is the H1.
Copy and Paste from Word
A Word document with properly formatted with headings will transfer headings and subheadings to Visual content window with a simple copy and paste. See the Microsoft Word page to learn tips to build an accessible Word document for this option.
- In a Word document, place the cursor in the content anywhere.
- Select Command + A, to select the entire Word document. This will select all the heading/subheading formatting in the Word Document.
- While the content is highlighted, select Command + C, to copy the content.
- Go to the Visual Tab and place the cursor in the dialogue box.
- Select Command + V, this will paste all content in the dialogue box. All the headings and subheadings will carry over.
Note: If the title or H1 heading was at the top of the page remove it and place it in the “Enter title here” text box. The H1 headings may need to be reformatted to H2 heading.
Link Text
Link text within a page or blog entry should clearly specify the destination of the link. Avoid vague such as, “here” or “here, here and here”). See Link Text Accessibility for more information.
See information at Sites at Penn State Quick Start Guide for specific instructions on creating a link.
Media Option
A list of media that Sites at Penn State’s WordPress platform is able to use can be found at WordPress Support.
Information on uploading various media can be found at ITS Training Handouts.
Image Alt Tags
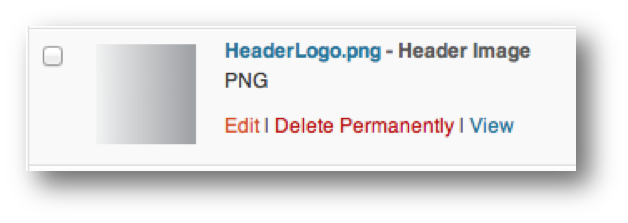
After uploading an image to the Media Library, the Image Alt Tag can be easily added. If the image is used for the Header, to customize your page the Alt Tag will NOT be associated.
- In the Left side menu panel, select the Media Library. This will show you the media you have uploaded to the site.
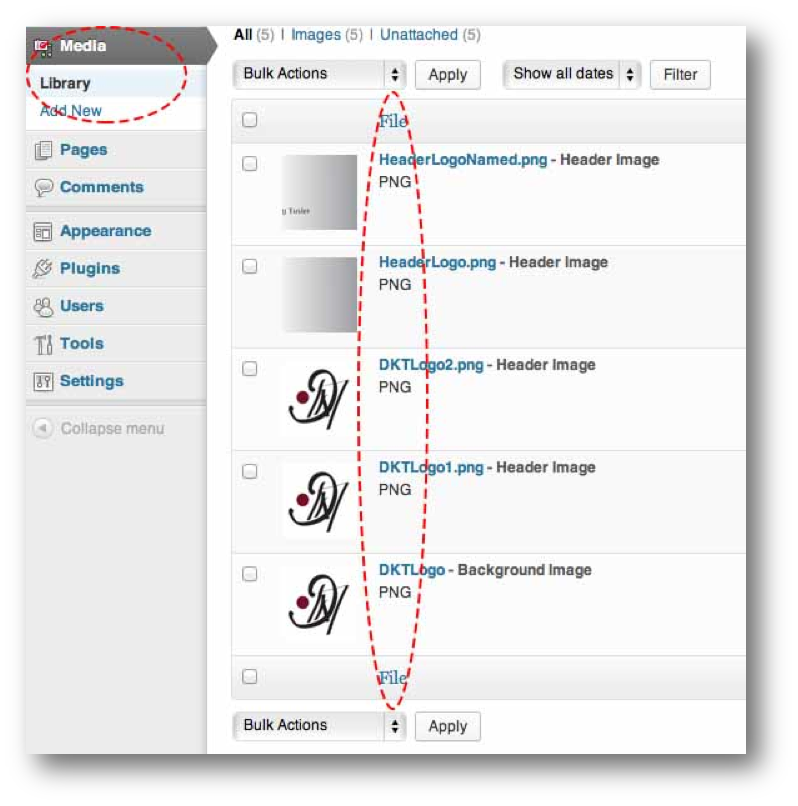
- Next, select the file you desire to use. Hovering over the file name will give you options.
- Select Edit.
- This will bring up the file and the alternative text can be place in the Alternative Text text box.
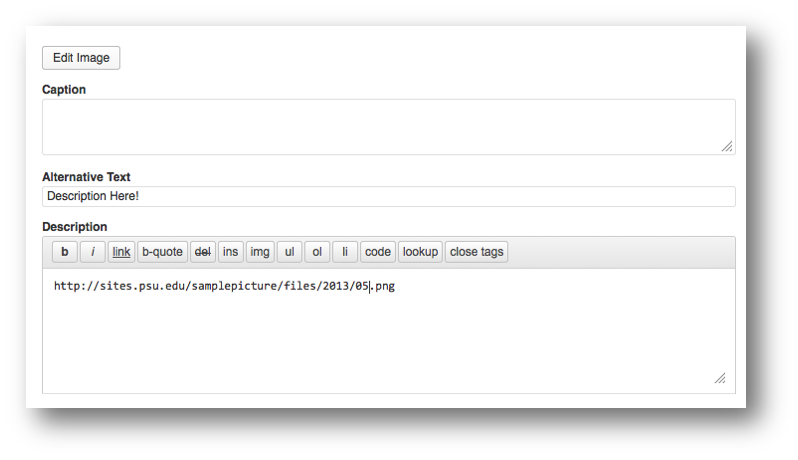
- Lastly, select the Update button in the Save Pane, located at the top right of the Edit Media page.

Empty ALT Text
If an image is used merely to emphasize the mood, then an empty ALT text can be inserted. This hides the image from the screen reader. Examples might include repetitive use of a logo or decorative toolbar or shape.
To insert empty ALT text, type a space character into the Alternative Text field.
When creating ALT text, it’s important to remember that it should describe the image. It should NOT include information about copyright or any extra information that would be relevant to a seeing audience. That information should be in a caption below the image. See the Image ALT Text Basics for an example.
Video and Audio
If you link or embed a video or audio file, then to maximize accessibility, you need to:
- Ensure that the video is captioned and that pages with audio files include a link to a transcript.
- Depending on the video, users with visual impairments may need access to an audio described video.
- Videoplayers should be accessible on a screen reader. See the Multimedia page for information.
Documents
For conveying information via the web, the use of a correctly formatted HTML web page is optimal for most screen readers. As a best practice recommendation, cutting and pasting an accessible Word Document, to the Visual content pane will effectively transfer over the headings to an accessible web page. Hear are tips to make an Accessible Microsoft Word document.
However, the WordPress platform used by Sites at Penn State allows for various document formats to be uploaded and to be placed on your website as a downloadable document. For long documents follow these tips and upload the document in the same manner at your discretion.
Uploading a PDF file is to be avoided or minimized. Many experts recommend this, due to the complexity to building an accessible PDF document. You can find out more about issues with PDF files and options to Convert PDF files.
Tables
Advanced Editor Tools Plugin
Activating the Advanded Editor Tools Plugin for each of your Sites will enable table creation and editing in the Visual WYIWYG editor.
Once the plugin is activated. The interface is similar to the Canvas Rich Text Editor for tables, and allows for the insertion of table headings and a caption. See the Canvas page above for instructions.
Note: This option allows you to directly edit the HTML code if tweaks are needed.
Table Press Plugin
This is a popular plugin, but it does NOT give you a completely accessible table, and some options may not be fully accessible. It does allow you to set a Table Head Row in the options below the data, but not insert a CAPTION or SUMMARY tag as required by WCAG guidelines.
Note: This option does not allow you to directly edit the HTML code if tweaks are needed.
Edit the HTML
Anyone with sufficient knowledge of HTML and CSS can build an accessible table in either Dreamweaver or another HTML editor and insert the code into the page. See the HTML Tables page for more information.
Customizing Your Sites
Header Image
Currently, there is NO way to modify the image ALT tag of the header image. The ALT tag is “#” by default and cannot be changed.
Background color
When choosing a background color or image take into account Contrast & Luminosity. A distracting pattern or florescent color will detract from the content.
Adding Widgets in Accessibility Mode
The widget tool includes an option to Enable Accessibility mode. This allows authors to add widgets by clicking a link instead of by drag and drop. This option could also be useful to anyone building a site on a mobile device.
Note: This option has nothing to do with making your final Web page more accessible to site visitors.
To enable accessibility mode.
- Enter the Widget area of your site Dashboard.
- Click on Screen Options or navigate to Screen Options hit Enter in the upper right.
- Select the link for Enable accessibility mode. Each widget will be displayed with an Add or Edit option.
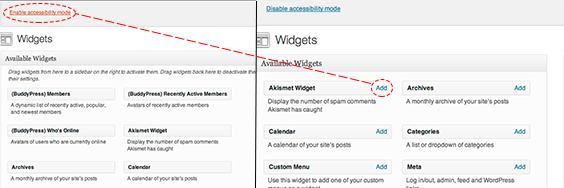
Note: If you are on a screenreader, click Enable accessibility mode.
Enabling Accessibility mode– Enables you to add widgets with an Add button, instead of drag and dropping with a mouse. However, accessibility mode here is referring to accessing the ability to place widgets in WordPress Platform without dragging and dropping. Dragging and dropping items cannot be done with a screen reader and keyboard.